How to configure your Spaces
A guide to setting up your spaces
A Meeting Hub Room / Space / Asset is a bookable space within one of your Location / Centers. Your organization may have a single or many bookable spaces across a single or many Locations / Centers. You might have a space with different configurations, e.g. a parent space that can be divided into two child spaces. Spaces can be configured to be hired by the hour, half or full day, and may have additional services, such as a projector or white board associated with them. Watch the YouTube Video Tutorial above to learn how to configure Rooms / Spaces / Assets for your Organization or follow the steps below.
To navigate to Rooms / Spaces / Assets, from the ‘Welcome’ button on the Home page click on ‘My Meeting Hub‘. Using the navigation Menu select ‘Manage Space / Facilities‘, then select ‘Rooms / Spaces / Assets‘
List Spaces
If your organization has multiple bookable spaces, they will display here in list view once set up.
Some organizations prefer to showcase their 'premium rooms' before other rooms on the search results page. This can be achieved by setting a display order from the Rooms / Spaces / Assets List View - Display Order Column. The number 1 represents the first space to be displayed with the largest number being the last space to be displayed. Any Space with a display order of 0 will not have a display order and current logic will apply.

The following actions are available for each Space:
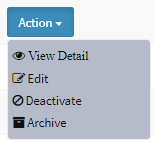
View Detail
Viewing the Space Details displays information relating to the space and its settings. The settings include the space capacity (maximum number of people), the setup time required, and the post-booking time required to reset the space. The rates of the space are also held here.
Edit
Editing a Space allows changes to the configuration of the space.
De-activate
Should a Space no longer be available, it can be deactivated using this option. Should the space become available in the future, it can be reactivated when you are ready. When deactivating a space, if there are future bookings within that space, a pop up will present asking if you are sure you want to proceed. Ideally, future bookings should be cancelled or moved to another space at this point.
When a Space is Deactivated, booking data will still be visible in Meeting Hub Reporting and for billing purposes. However, you will not be able to search or manage historical bookings under the Manage Bookings > List bookings Menu for this Space. If you need to manage a booking in a Space that is deactivated, you will need to Activate the Space first.
Archive
If a Space is permanently decommissioned it can be removed by selecting ‘Archive’.
TIP: if a Space is accidentally archived, please contact the Meeting Hub support team who will be able to assist in retrieving the Space.
Add

TIP: If you have any vacant space, these can be added as a temporary bookable space (note this may affect your licencing costs).
Select Location / Center
Here you should select the Location / Center that the Space is within.
TIP: The Location / Center must be configured before you can link a Space to it.
Space Name
The space name displays when searching for a space, on the booking page, the confirmation page, and on the billing file. It also displays on the Calendar to show upcoming bookings.
Capacity (seating)
The maximum number of people that the space can hold.
TIP: If multiple setup options are available, you can list these in the Meeting Room Description field.
Floor level
The floor on which the meeting room is located.
Minimum booking hours and minutes
This field sets the minimum booking duration that bookings can be made for.
Maximum booking hours and minutes
This field sets the maximum booking duration that bookings can be made for. Note, by default this is set to 23.59.
TIP: if you do not charge hourly rates for your spaces it is important to add a minimum booking duration of 4 hours (half a day) to ensure that customers are unable to book for less than half a day.
Bookable start and end time
These settings control the times during which your customers can book the space. The settings can be overridden by your organization’s Business Center Admins if required.
TIP: Your Center / Location operating hours determine when bookings can be made. If your Center / Location is configured to close at 5:30pm but your Space is configured to be bookable until 8:00pm customers will not be able to book the space after 5:30pm and the booking will need to be made by a Business Center Admin
Space Description
Here you can enter a description about the Space which displays on the search results page to all users. Please note only the first 150 characters will be displayed, however the User will be able to click ‘Read more’ to read a description that is longer than 150 characters. You can use this field to describe the features and location of the room. If there are any specific requirements for booking this space, you can also list them here.
Space type
Spaces can be categorized based on the type of Space they are E.g. Meeting Room, Recreation, Hot Desk. These Space Types can then be searched by your customers when checking for availability. Organizations that track revenue in their accounting system with different General Ledger Codes based on Space Types will want to configure these General Ledger Codes within the Organization Settings.
Status
Spaces are either ‘Active’ – meaning it displays as a bookable space, or ‘Inactive’ – meaning it does not display as a bookable space. Use the feature to remove spaces that are temporarily unavailable without having to archive the space.
Preparation Time
Preparation time relates to the amount of time required between bookings. By adding a preparation time onto a Space, it creates a buffer between bookings and prevents a booker from making a back-to-back booking.
Additional services
Amenities such as a projector, plasma tv, tea and coffee etc can be loaded onto each meeting room at a per person, per hour, or flat rate. These show as bookable items on the main booking page and can be added as additional charges to an existing booking.
TIP: If an amenity is not showing as an option on your Space, make sure it is selected on Organization Settings.
Rates
Spaces can be configured with hourly, half-day and full-day rates. These rates are the default rates for the Space. If you do not configure an hourly rate, it is important to set a minimum booking duration that matches your rates E.g. if you only have half day and full day rates you should set a minimum booking duration of 4 hours OR customers will not be charged for usage until the event reaches the first setting E.g. Half Day / Full Day.
NOTE: Internal client discounts can be applied to these rates allowing users to receive custom discounted pricing on Space hire. The user must be logged in and associated with a company that has a discount programmed on its Client settings.
Photo
Photos of your spaces are displayed throughout the booking process. Click ‘Upload Image‘, multi-select the photos you wish to upload, and click Open. You can upload up to 5 photos of your space (up to 1MB per photo) with the exception of 'Free Package' customers who can upload just one photo per space.
Blackout Periods
Should some of your spaces have a regional holiday that does not apply to the whole organization or be closed for renovation, you can set a blackout period at the Space Level.
To 'Blackout' a date range, enter a Start Date and an End Date. The selected spaces will be unavailable for bookings, inclusive of the entire range. To 'Blackout' a single day, simply enter the Start Date. To 'Add More' 'Blackout' dates or date ranges, click the 'Add More' button. You can add up to 20 'Blackout' Dates. If you wish to remove a 'Blackout' date, click the 'Remove' button next to the date range.
Combine
This feature allows an organization to configure two ‘child’ Spaces and then combine them to create a ‘parent Space’. This is particularly useful when there is a space that features a retractable wall. Meeting Hub uses real-time availability therefore if one of the ‘child spaces’ is booked the ‘parent space’ will NOT display as available. Likewise, if the parent space is booked, neither child space will display as available for bookings.
To combine spaces, first, there must be two spaces configured of the same ‘Space Type’, these are known as ‘child spaces’. Now a parent space must be created (this will be the two child spaces to be combined) of the same ‘Space Type’ as the ‘child space’. Once the parent space has been created the ‘Combine Spaces’ button at the bottom of the ‘Edit Space’ page should be clicked. Now select the two-child spaces and click ‘Combine Spaces’ again followed by Save.


Copyright Ⓒ 2021 Meeting Hub. All Rights Reserved