
How to get started with Meeting Hub
A step-by-step guide to setting up your organisation and getting ready to take bookings
The Meeting Hub Knowledge Base is designed to guide you through the setup, management and day-to-day use of Meeting Hub.
Use the steps below to configure your organisation, locations, bookable spaces, customers and billing before going live. Click the links within each section for detailed instructions.
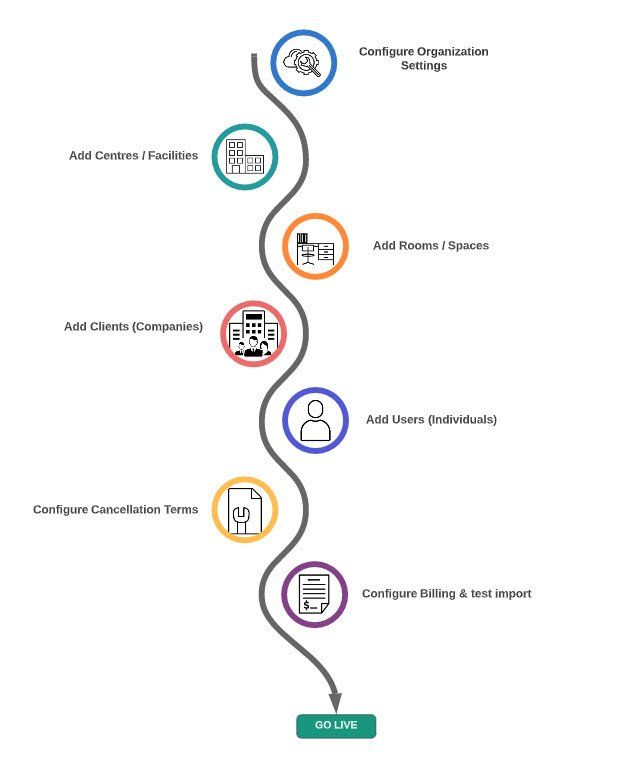
Step 1: Configure Organisation Settings
Start by adding your organisation details in My Organization Settings.
From the main menu, go to:
Manage Space / Facilities > My Organisation Settings
These settings apply to your organisation as a whole. If you only operate from one location, it is fine for some information to be repeated in both My Organisation Settings and your Location / Centre settings.
We recommend leaving the Accounts/Finance section until the later billing setup stage.
How to configure My Organization Settings
Step 2: Configure Locations / Centres
Create the locations or centres where your bookable spaces are located.
Each location has its own settings, including address, contact details, opening hours and other location-specific information.
How to configure Location / Centre Settings.
Step 3: Configure Rooms / Spaces / Assets
Create the individual spaces customers can book within each location, such as meeting rooms, halls, offices, hot desks, studios or other shared facilities.
Configure each space's availability, pricing, capacity, minimum booking duration, amenities and other booking settings.
How to configure Room / Space / Asset.
Step 4: Add Companies (Clients)
Companies or Clients represent the organisations that book your spaces.
Each Company can have its own pricing, discounts, gratis minutes (free usage) and payment arrangements. Companies can also be created automatically when customers register.
How to set up Companies (Clients)
Step 5: Add Users (People)
Users are the individual people associated with a Company / Client.
Each User inherits the Company's pricing and booking settings, including any agreed discounts or gratis minutes.
How to set up User Types in Meeting Hub User Types
Step 6: Configure Cancellation Terms
Set the cancellation rules that will apply when a booking is cancelled.
You can configure different cancellation options depending on the amount of notice provided.
How to configure Cancellation Terms
Step 7: Configure Billing and complete Test import
Set up the billing information required for invoicing, payment reconciliation and financial reporting.
If you are importing existing bookings, complete a test import first to confirm your billing data has been configured correctly.
How to configure and Manage Billing
Step 8: Test the Booking Experience
Before going live, complete a test booking as a customer.
Check that:
- availability displays correctly
- pricing is accurate
- booking rules are applied as expected
- confirmation emails are received
- payment settings are working correctly
- the booking appears correctly in the Administrator area
Once your test booking has been completed successfully, you are ready to start accepting bookings through Meeting Hub.
You're Ready to Go Live
Once the setup steps above are complete and your booking journey has been tested, you can begin directing customers to your Meeting Hub booking page and start taking online bookings.
Need help along the way? Use the Need Support button within Meeting Hub to access Knowledge Base articles relevant to the page you are working on or reach out to the support team - support@meetinghub.com.au.